
前言
本文会介绍如何基于 Github Pages + Github Actions + Hugo 搭建个人博客网站,主要包括以下特性:
- 完全免费
- 版本控制
- CI/CD
- Markdown语法
- 个性化主题
前置知识
必备条件
- Github 账户
效果展示:https://hughxia.github.io
项目地址:https://github.com/hughxia/hughxia.github.io
创建 GitHub Pages 站点
Github Pages 适用于具有 GitHub Free 和组织的 GitHub Free 的公共仓库,以及具有 GitHub Pro、GitHub Team、GitHub Enterprise Cloud 和 GitHub Enterprise Server 的公共和私有仓库。
Github Pages 支持从特定的 GitHub Repo 生成静态站点。这里参照Github Pages 官方文档创建属于你的个人站点。
新建仓库
首先新建一个 Repository,Repository name 根据 Owner 的不同,名字要求分别为 <user>.github.io 或 <organization>.github.io 格式。因为是个人博客,这里使用自己的用户名。
查看设置
当创建完成后,Github Repository 页中就能看到刚刚的 <user>.github.io 仓库。
在 Settings 菜单中的 Pages 栏中,查看并修改相关设置。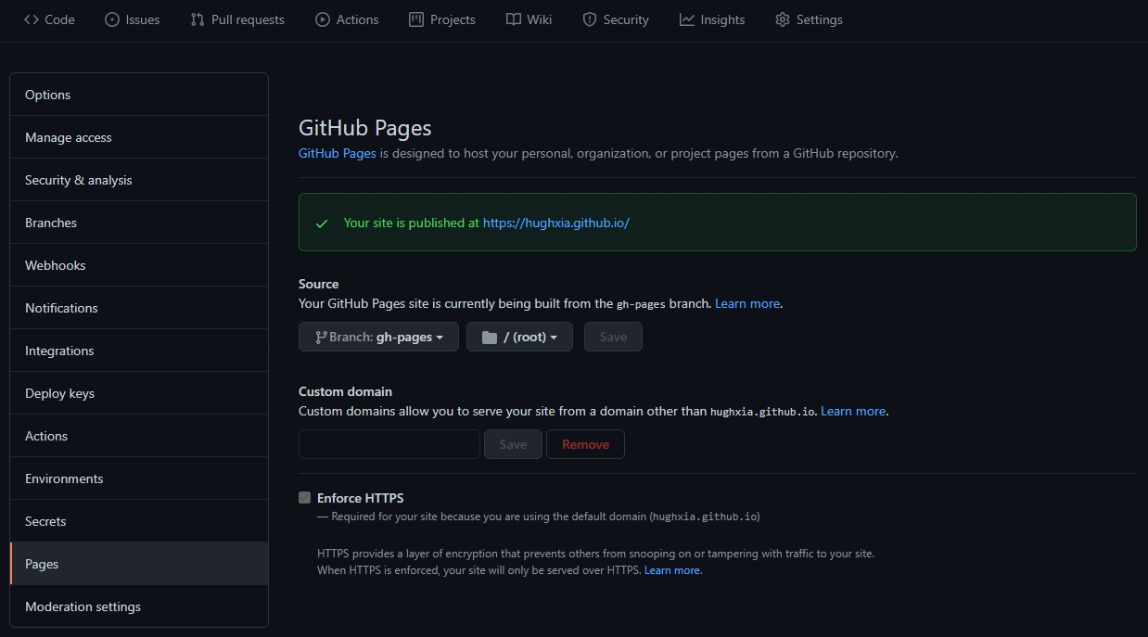
Source 项配置了站点的发布源,默认应为 main 分支的根目录。图中设置为了 gh-pages 分支,原因后面再讲。
Custom domain 项则支持配置自定义域名,并启用HTTPS。
使用 Hugo 生成博客框架
Hugo is one of the most popular open-source static site generators. With its amazing speed and flexibility, Hugo makes building websites fun again.
要搭建完整的 Blog 还需要 博客生成器 的帮助。目前主流的三大工具分别为 Hugo,Jekyll 和 Hexo。其中Hugo的 ⭐ 最多,编译速度也最快,这里选用它来做示例。
安装Hugo
MacOS 和 Linux 系统都可以直接在命令行进行安装,Windows 系统请参考官方文档。以 Ubuntu20.04 为例,打开终端,输入:
apt install hugo
安装完成后,通过以下命令进行确认:
hugo version
新建站点
进入上面创建的 <user>.github.io 项目路径,执行下面的命令,Hugo会在当前路径创建站点框架。默认配置文件格式为 TOML 格式,可以通过 -f yaml 参数修改为较为熟悉的 YAML 格式。
hugo new site . -f yaml
选择主题
官方主题页有丰富的主题可供选择,下面以我使用的 hugo-theme-stack 为例。
通过 Git Submodule 机制将该主题仓库添加为子模块:
git submodule add https://github.com/htdvisser/hugo-theme-stack.git themes/hugo-theme-stack
注意: 当使用 git clone 命令拉取远程仓库的时候,默认不会拉取子模块仓库,需要通过添加 --recurse-submodules 参数来同步拉取。 或者执行以下命令:
git submodule update --remote --merge
编辑配置
在项目根目录下可以找到 config.yaml 文件,这是整个Hugo项目的配置文件,修改 baseurl , languageCode , title 和 theme 这几个字段完成基本配置。主题往往都会提供丰富的组件和个性化功能,请参考对应文档进行配置。
baseurl: https://hughxia.github.io/
languageCode: zh-cn
theme: hugo-theme-stack
title: Hugh's Blog
创建文章
执行以下命令创建一篇文章:
hugo new post/first-post.md
Hugo 会在 Markdown 文件头部以配置文件相同语法的形式添加一些 Meta 信息,在分隔线 --- 下方编辑文章内容。
本地预览
启动 hugo server,即可在本地http://localhost:1313实时预览。
hugo server -D
加上 -D 参数会预览草稿内容,通过 hugo new posts 命令创建出来的文章顶部 Meta 信息中默认 draft 设置为 true ,当编辑完成准备正式发布时,需要将其改为 false。
通过 Github Actions 自动部署
在 GitHub Actions 的仓库中自动化、自定义和执行软件开发工作流程。 您可以发现、创建和共享操作以执行您喜欢的任何作业(包括 CI/CD),并将操作合并到完全自定义的工作流程中。
部署问题
现在通过 hugo 命令在 public 文件夹下生成最终页面。可以将这个文件夹也加入到 Git 的版本控制,然后通过在上述 Settings 页中将 Source 中的目录改为 public 来完成部署。
不过,这需要在每次在完成文章创作,同步至 Github 之前都需要生成 public 文件夹。这样不仅麻烦,还会在当前仓库中增加很多冗余文件。下面通过 Github 官方推出的 CI 利器 Github Actions 完美地解决上述问题。
基本概念
首先来了解下 Github Actions 的基本概念:
- 工作流程(workflow): 工作流程是您添加到仓库的自动化过程。
- 事件(event): 事件是触发工作流程的特定活动。
- 作业(job): 作业是在同一运行服务器上执行的一组步骤。
- 步骤(step): 步骤是可以在作业中运行命令的单个任务。
- 操作(action): 操作是独立命令,它们组合到步骤以创建作业。
Workflow配置
在 Github 的 Repo 页的 Actions 菜单中新建一个 Workflow 进行自定义配置。示例:
name: CI

# Controls when the workflow will run
on:
  # Triggers the workflow on push or pull request events but only for the main branch
  push:
    branches: [main]
  pull_request:
    branches: [main]

  # Allows you to run this workflow manually from the Actions tab
  workflow_dispatch:

# A workflow run is made up of one or more jobs that can run sequentially or in parallel
jobs:
  # This workflow contains a single job called "build"
  deploy:
    # The type of runner that the job will run on
    runs-on: ubuntu-latest

    # Steps represent a sequence of tasks that will be executed as part of the job
    steps:
      - name: Git checkout
        uses: actions/checkout@v2
        with:
          submodules: true # Fetch Hugo themes (true OR recursive)
          fetch-depth: 0 # Fetch all history for .GitInfo and .Lastmod

      - name: Setup Hugo
        # You may pin to the exact commit or the version.
        # uses: peaceiris/actions-hugo@2e89aa66d0093e4cd14751b3028fc1a179452c2e
        uses: peaceiris/actions-hugo@v2.4.13
        with:
          hugo-version: "0.84.4"

      # Runs a single command using the runners shell
      - name: Build
        run: hugo --minify

      - name: Deploy
        uses: peaceiris/actions-gh-pages@v3
        if: github.ref == 'refs/heads/main'
        with:
          github_token: ${{ secrets.GITHUB_TOKEN }}
          publish_dir: ./public
上述配置意为当 push 代码至 main 分支时,在最新的 Ubuntu 系统环境下依次完成以下操作:
检出
main分支最新代码安装指定版本的
hugo通过
hugo --minify以最小化的方式打包网页至 public 文件将打包后的文件夹推送至当前仓库的
gh-pages分支
还记得在上面图片中在 Pages 也的配置么,Github Pages 会从 gh-pages 分支的根目录生成最终的网页。可以在 Actions 页查看 Job 的执行情况。当执行完成后,一般等待 1 分钟左右,就能在自己的博客网站看到最新提交的内容了。
后记
经过上述步骤,就轻松完成了一个属于你自己的博客网站的搭建(别忘了定制个性化主题哦~),接下来就随心所欲地开始内容创作吧。